https://mondo.com/wp-content/smush-webp/2023/03/in-demand-ecommerce-tech-skills-2023.jpg.webp
Automating E-Commerce: A DevOps Engineer’s Journey from Code to Cloud

Building a Resilient E-Commerce Platform with Docker, Terraform, Kubernetes, Github actions & Argo CD
Introduction
E-commerce platforms operate in fast-paced environments where scalability, automation, and reliability are critical to handling real-time transactions, inventory management, and customer interactions. Businesses rely on cloud-native architectures, containerization, and infrastructure automation to keep their systems running efficiently while ensuring seamless deployments and continuous delivery.
This project serves as a hands-on implementation of scalable DevOps practices in an e-commerce environment. By containerizing microservices with Docker, provisioning infrastructure using Terraform, and deploying onto Amazon EKS, it showcases a fully automated, scalable cloud-native solution suitable for high-traffic applications.
To streamline deployments, the project integrates GitHub Actions for CI and Argo CD for CD, implementing a robust GitOps workflow that ensures code changes are automatically built, tested, and deployed with minimal manual intervention. With each microservice independently managed and deployed, the infrastructure supports flexibility, fault tolerance, and operational efficiency.
Throughout this blog, I’ll walk through the design, implementation, and automation strategies that make this system scalable and production-ready. Whether you’re a DevOps engineer looking to enhance your understanding of IaC, Kubernetes, and CI/CD, or a developer exploring e-commerce microservices, this post will provide insights into modern architecture and deployment practices.
Architectural Overview
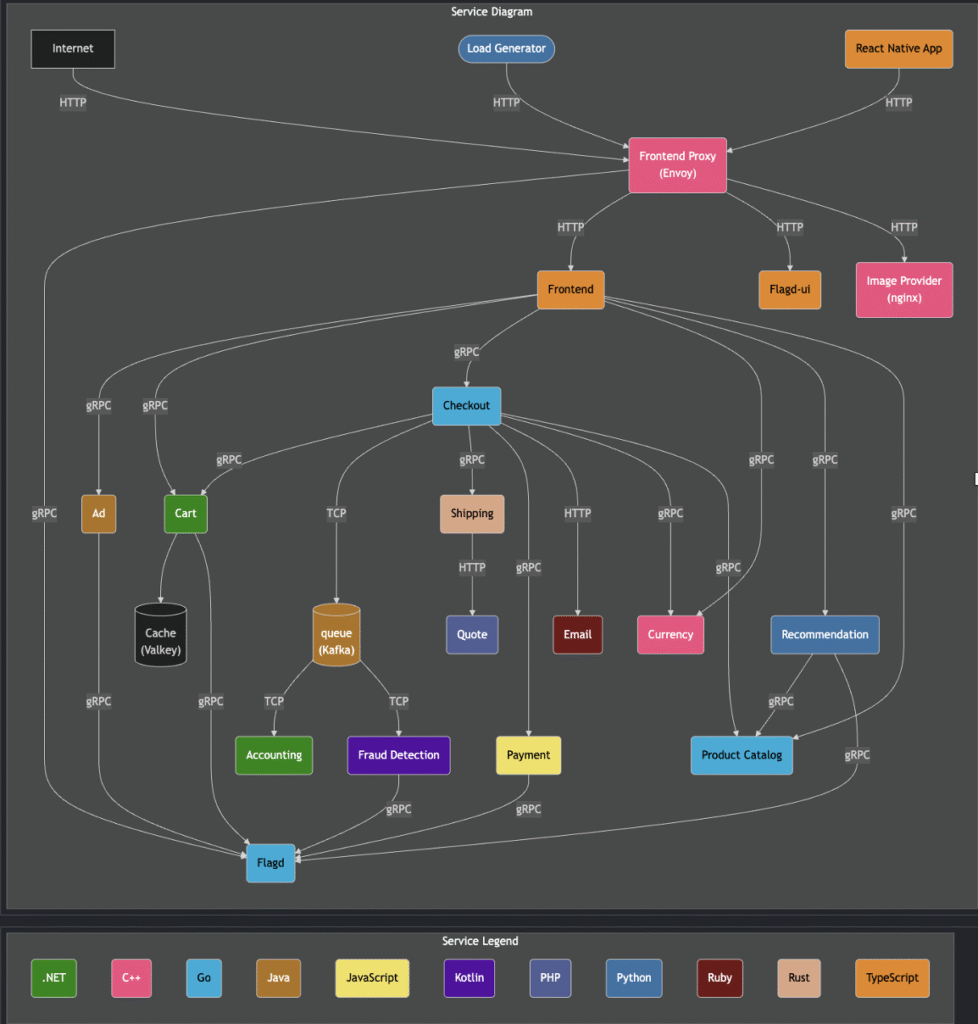
This e-commerce application follows a microservices architecture, where each service operates independently and communicates with others via well-defined APIs. This approach enables scalability, fault tolerance, and flexibility, ensuring that individual services can be deployed, updated, or scaled without impacting the entire system.
Key Microservice components:
User-Facing Services: The React Native app and frontend handle customer interactions, while the Frontend Proxy (Envoy) manages request routing to backend services.
Commerce & Checkout Services: These include the Cart, Checkout, and Shipping services, responsible for order management and fulfillment.
Payments & Fraud Prevention: The Payment service handles secure transactions, while Fraud Detection helps prevent unauthorized purchases.
Infrastructure Optimization: Services like Queue (Kafka) for asynchronous messaging and Cache (Vallkey) for fast data retrieval enhance performance.
Feature Management: Flagd enables dynamic feature toggling, allowing controlled rollouts of new functionality.
containterizing microservices with Docker
Containerizing microservices ensures portability, consistency, and scalability across environments. Docker allows services to be packaged with their dependencies, preventing compatibility issues between different environments. In this project, the goal was to keep images lightweight and secure, enabling faster deployments and reducing potential vulnerabilities.
However, before building the Dockerfile, it’s best to run the application locally to verify functionality and troubleshoot potential issues.
lets take an example of the ad micro service first ran locally:

Docker file structure
Using multi-stage builds in the Dockerfile significantly optimizes image size by including only the necessary components in the final build.To achieve lightweight, production-ready container images, I implemented multi-stage builds in the Dockerfile. The first stage (eclipse-temurin:21-jdk) builds the application, fetching dependencies and compiling the code, while the second stage(eclipse-temurin:21-jre) creates a minimal runtime environment, reducing unnecessary layers.
The multistage Dockerfile for the ad micro service:

Dockerfile Best Practices implemented:
- Defined a Working Directory (/usr/src/app) to maintain a clean build context.
- Used multi-stage builds to separate the compilation process from the final runtime environment.
- Ensured proper permissions ( chmod +x ) for execution of Gradle and application binaries.
- Minimized unnecessary dependencies in the final image for lightweight
- Used ENTRYPOINT to run the container in executable form, preventing command overrides and ensuring predictable application behavior..
Local Testing & Optimazation:
Before deploying, I performed local testing using:
- docker build to ensure the image was correctly built.
- docker run to verify application execution within the container.
- Performance optimizations, ensuring startup time was minimal.
- Dependency validation, confirming dependencies were successfully installed.
This approach ensures a secure, efficient, and well-structured containerized microservice, ideal for cloud-native deployments.
Infrastructure provisioning with terraform
For this project, I wanted an infrastructure provisioning tool that could streamline deployments, maintain consistency, and support scalability. Terraform emerged as the ideal choice, offering Infrastructure as Code (IaC) capabilities that enable me to define, automate, and manage cloud resources declaratively with efficiency and precision.
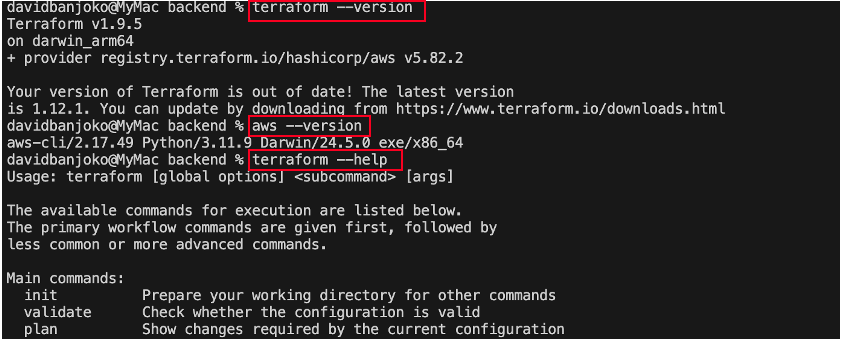
Prerequisites:
Before you begin provisioning AWS resources, ensure you have the following set up:
- VS Code: Use it as your primary IDE for writing and executing Terraform code.
- Terraform & Plugins: Install Terraform and any necessary plugins or extensions.
- Source Code Repository: Prepare your repository on GitHub for version control and collaboration.
- Terraform Docs: Leverage the terraform documentations to accelerate your development process.
State file management
To avoid storing Terraform state locally, I provisioned an S3 bucket and a DynamoDB table using Terraform, ensuring remote storage and state locking.
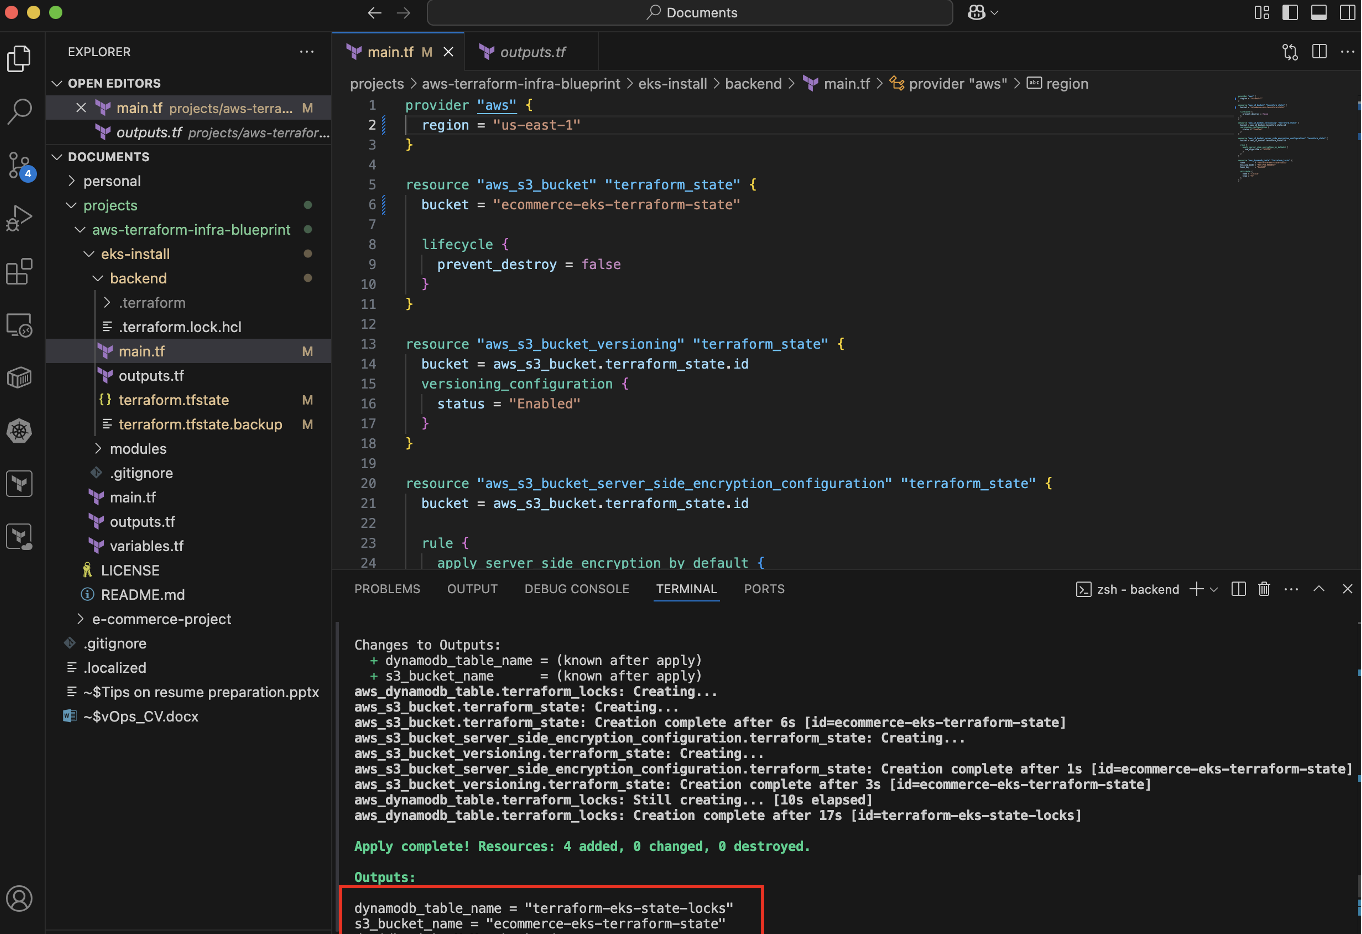
- The S3 bucket keeps the state file centralized and accessible across environments
- The DynamoDB table prevents concurrent Terraform modifications, ensuring state integrity.
- Run terraform init to initialize the backend after configuration.
Provisioning VPC & EKS with Terraform
Terraform enables modular infrastructure provisioning, ensuring flexibility and reusability in cloud environments. In this project, I structured VPC and EKS deployment using parent and child modules, making the setup organized, scalable, and maintainable.
VPC set up
A Virtual Private Cloud (VPC) provides an isolated network environment, essential for securely running cloud applications. Terraform automates the creation of subnets, route tables, and security groups, defining a structured and reliable network.
Terraform VPC Module Configuration:
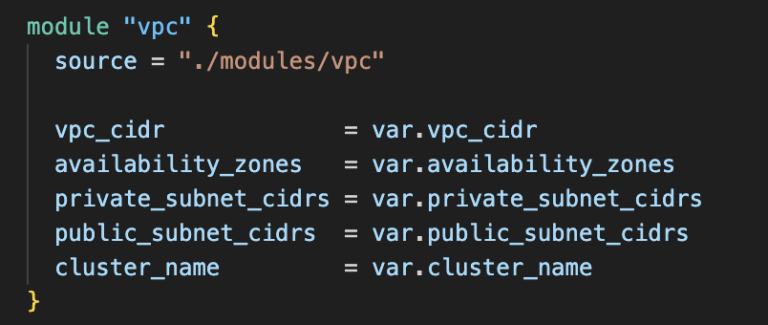
key benefits:
Network isolation with private subnets for security.
Multi-AZ architecture for high availability.
Structured CIDR allocation to simplify future scaling.
EKS Cluster Deployment
Amazon Elastic Kubernetes Service (EKS) simplifies Kubernetes management, handling control planes while Terraform provisions worker nodes, networking, and IAM roles for seamless integration.
Terraform EKS Module Configuration:
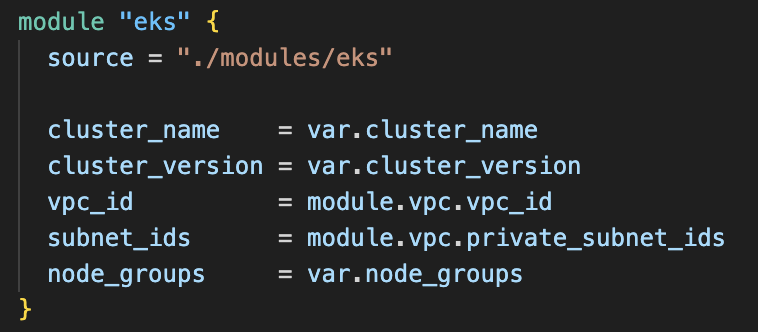
Key benefits:
- Automated cluster creation without manual configurations.
- Secure VPC integration for private networking.
- Kubernetes auto-scaling ensures resource efficiency.
Challenges & learning
Throughout the process, several challenges emerged:
- State Management Complexity: Using remote storage with S3 and locking with DynamoDB prevented conflicts but required fine-tuning.To solve this i configured versioning and encryption for state files to ensure safety and rollback capability.
- Module Dependencies: Managing VPC and EKS as separate child modules while ensuring proper variable passing was tricky.To solve this i established clear input variables and dependencies between modules for seamless integration.